PaymentsHQ
This book contains all the Help Articles that are linked to PaymentsHQ.
- Main Menu / Dashboard
- Dashboard Tile Guide
- Payment/Refund Requests
- Request Overview
- Send a Payment Request
- Send a Refund Request
- Transaction List
- Search
- Batches and Deposits
- Statements
- Bank Activity
- Account Information
- Manual Transactions
- Virtual Terminal
- PayMe
- Creating a PayMe
- PayMe Use Case - Sell Merchandise
- Customer Pay
Main Menu / Dashboard
PaymentsHQ is your central hub for managing your payment activity with SportsPay. From your dashboard, you can:
- View and search detailed transaction reports
- Track batch settlements and deposits
- Download your monthly statements
- Review and update your organization's information
- Update your bank account details
- Access additional tools and features available through SportsPay
Need help on a specific page?
Every page in PaymentsHQ includes a blue question mark icon labeled "Help" at the bottom right-hand corner. Clicking this icon will open the Help Article related to the page you're currently on, giving you instant, relevant guidance without navigating away.
Looking for the full Help library?
You can access all available Help Articles by clicking on the Help Center tile from the Dashboard. You can also access it by clicking on your Organization's Name in the top-right corner of the page in the navigation bar, and from the dropdown menu, select Help Center. This will take you to the full library of Help Articles - your go-to resource for tutorials and feature explanations across PaymentsHQ.
Can't find what you're looking for? Our team is just a message or call away - contact us at support@sportspay.com or 1-877-880-0321.
Dashboard Tile Guide
| Tile | Description | Category |
|---|---|---|
| Manual Transactions | Use the Virtual Terminal to manually process payments by entering card and amount details. These payments appear in your transaction list. | Collect Money |
| Payment Requests | Send a custom payment request to an individual. The recipient gets an email with a secure link to complete the payment. | Collect Money |
| Refund Requests | Initiate full or partial refunds directly from within PaymentsHQ. Refunded transactions are automatically updated in your reports. | Manage Money |
| PayMe Forms | Create a payment form with a shareable link to collect payments from multiple people — perfect for registrations, tournaments, or donations. | Collect Money |
| Transaction Lists | See a list of all approved, declined, or refunded transactions. Click any entry to view full transaction details, including the card type and status. | Find Info |
| Search | Use filters like Ref #, name, amount, or date to locate any transaction, batch, or request. Results can be exported to CSV. | Find Info |
| Batches & Deposits | Every night at 12:00am EST, transactions are settled into a batch. Weekly deposits (Tuesday → bank by Wednesday) summarize Mon–Sun batches. Click Detail to view batch-level transactions. | Bank Activity |
| Bank Activity | Reflects deposits or withdrawals made to your bank account, including billing fees and refunds. Helps reconcile against your bank statement. | Bank Activity |
| Statements | Download monthly PDF statements showing sales, deposits, billing charges, and fees. Great for accountants or year-end reports. | Reports |
| Transfers | Send or receive inter-merchant transfers — ideal for organizations with multiple sub-units, clubs, or departments. | Manage Funds |
| Linked Accounts | Consolidate reporting for multiple merchant accounts under your organization. Helps with cross-team oversight and shared administration. | Advanced Reporting |
| Account Info | View and request updates to your account details, such as contact name, banking information, or organizational profile. | Settings |
| Help Center | Access how-to guides and FAQs. You can also click the blue Help button at the bottom-right of any screen, or email support@sportspay.com. | Support |
Payment/Refund Requests
This is where you are able to send Payment Requests and Refund Requests, and track each of them.
A Payment Request is where you are collecting money from the Recipient. It allows you to send out a Request via email to a Recipient for a set amount. The Recipient will click on the link embedded in the email, which brings them to a Payment Page where they will then input their credit card information to complete the payment.
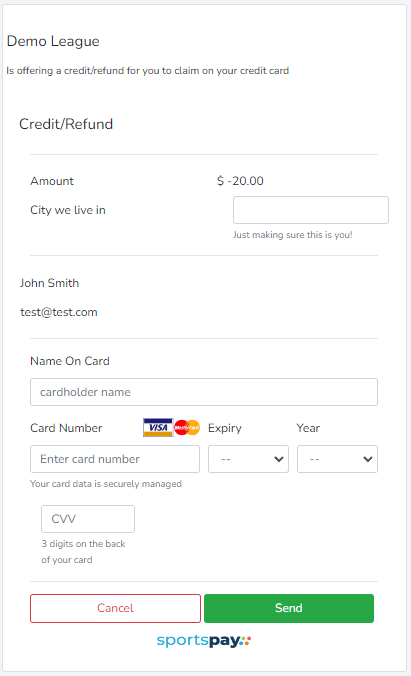
A Refund Request is where you are returning/refunding money, and you are requesting that the Recipient provide the credit card number to which the refund should be sent. The Recipient will receive an email where they will click on the embedded link and be brought to a Payment Page where they will input the credit card that the refund should be applied to. All Refund Requests require that the Recipient correctly enter the Secret Answer (a word/password that is set by you - refer to Help Page under Send Refund Request for more details).
Tracking your Requests
Your Requests are organized into three reporting groups:
- Outstanding: Requests that have been sent but have yet to be completed by the Recipient. These include requests with a status of Expired and Security.
- Paid: Requests that have been successfully completed. They are automatically moved over to the Paid group.
- Cancelled: Requests that have been cancelled by you. You must manually select the Cancel button to move a request from Outstanding to Cancelled.
Request Overview
Click on the Recipient's Name for an overview of the request and to view further details such as its history.
Status
Each Request can have a different status:
| Signifies that this request is a Refund Request | |
| A request that has expired. You will need to either Cancel the request or select Modify & Resend in order to change the Expiry Date and have a new link sent to the Recipient. | |
| A status applicable only to Refund Requests, and it occurs when the Recipient has entered the wrong Security Answer three times. You will need to either Cancel the request or select Modify & Resend in order to reset the request. |
Actions
Depending on the reporting group you are viewing and the status of the request, there are different Actions available:
![]() Preview: View the Payment Page
Preview: View the Payment Page
![]() Modify & Resend: Edit the Request and/or Resend
Modify & Resend: Edit the Request and/or Resend
![]() Send Email Reminder: System will send out an email reminder to the recipient
Send Email Reminder: System will send out an email reminder to the recipient
![]() Share Link: Copy the URL/Link for the Payment Page
Share Link: Copy the URL/Link for the Payment Page
![]() Cancel: Delete the Request
Cancel: Delete the Request
Frequently Asked Questions
Do Payment/Refund Requests expire?
A Payment Request can be valid for a maximum of 45 days. When creating a new Payment Request, you will be required to set the Expiry Date. If you need to extend a Payment Request, select Modify and choose a new Expiry Date.
A Refund Request is only valid for a maximum of 7 days.
How do I resolve a request with a Security status?
If one of your Refund Requests is showing a status of Security, that means that the Recipient entered in the incorrect Secret Answer at least three times.
Before resolving the request, please ensure that you are sending the Refund Request to the correct e-mail address and that the Recipient knows the Secret Answer.
One confirmed that the Refund Request is being sent to the correct individual, select "Modify & Resend" under Actions, and simply send the Request again. You may want to choose a new Secret Answer or update the Expiry Date.
Request Overview
Overview
This is where you are able to get a complete overview of your Request, including all of the applicable field values:
- Recipient name
- Recipient email address
- Amount
- Expiry Date
- Secret Hint and Secret Answer
- Invoice Label and Value
- Description Label and Value
- Request Message
- Customer pays a processing fee
- Next automatic email reminder
Actions
You can Modify & Resend, and Cancel the Request using the applicable buttons.
Status
| Signifies that this request is a Payment Request (as opposed to a Refund) | |
| Signifies that this request is a Refund Request (as opposed to a Payment) | |
| A request that has not been paid or claimed | |
| A request that has been paid or claimed - it is completed. | |
| A request that has been cancelled and has not been paid/claimed. | |
| A request that has expired. You will need to either Cancel the request or select Modify & Resend in order to change the Expiry Date and have a new link sent to the Recipient. | |
| A status applicable only to Refund Requests, and it occurs when the Recipient has entered in the wrong Security Answer three times. You will need to either Cancel the request or select Modify & Resend in order to reset the request. |
Activity Log
View the entire history of the request under Activity Log. All significant activity related to the request will be date and time-stamped here, along with a brief description.
Send a Payment Request
A Payment Request is where you are collecting money from the Recipient. It allows you to send out a Request via email to a Recipient for a set amount. The Recipient will click on the link, be brought to the Payment Page, and they will input their credit card information to complete the payment.
Required Fields
The following fields must be completed for each Request:
Name of Recipient: This is the name of the person to whom you are sending the Payment Request. This does not have to match the name on the credit card.
Email Address: This is the email address for the Recipient to whom the Payment Request will be sent.
Amount: The amount of the Payment that the Recipient's credit card will be charged.
Expiry Date: This is the date that the Request will expire at 11:59pm EST. For example, if the expiry date is October 16th, the Request can accept a payment up until 11:59pm EST on October 16th. Payment Requests can be active between 1 and 45 days.
Optional Settings
You may choose to configure the following settings:
Enable Automatic Reminders: This option enables automatic payment reminder emails to be sent out to the recipient at the chosen interval (e.g., every 7 days) until the payment is either completed or expires. Use the drop-down to customize the frequency of reminders. At any time, you can shut off or modify the automatic reminders. You can also track when the next reminder will be sent out by looking at the Request's Overview page.
(Alternatively, you can manually initiate sending a payment reminder using the Action button on the Payment Request home page.)
Do not pass processing fees onto the customer: This setting will only appear if you are on a CustomerPay pricing plan. The default is to have the processing fees passed onto the customer, however, you can override this by selecting the box, in which case, you will be responsible for paying the processing fees for that transaction.
Optional Fields
Both the Invoice Field and Description Field are optional and are designed to give you flexibility. You may use the fields as you choose.
The Invoice Field and Description Field each have two fields within them: Field Label and Value
- The Field Label refers to the Label attached to the field and is used to either (a) describe the information in the Value field, or (b) provide instruction for what should be inputted in the Value field (if you choose to use the field to collect information from the Recipient).
- The Value field refers to the information within that field and can be used to either (a) display information, or (b) collect information from the Recipient. To collect information from the Recipient, simply leave the field blank when you are completing the Payment Request form.
The Invoice Field is intended for Invoice Numbers, Program Names, and the like. If the Payment Request is associated with another transaction, by inputting the same Invoice Number in the Value, you will be "grouping" the transactions together, which is helpful for reporting purposes. The Invoice Field can have a maximum of 20 characters in the Value.
The Description Field is intended for detailed information such as a player's name, preferred position, and the like. It can have a maximum of 30 characters in the Value, making it suitable for collecting more detailed information.
Below is an example of using both fields to display information:

Collecting Information
You can use both the Invoice Field and Description Field to collect information from the Recipient. To do so, check off the box to include the field and provide a Field Label. You must leave the Value field blank and check the Required box.
Below is an example:

Previewing the Payment Page
Before sending the request, you will be able to view the payment page by selecting "Preview."
Below is an example of the Payment Page when sending a Payment Request:

Frequently Asked Questions
Example of completing the form
Below is an example of completing the form:
Below is an example of how the above completed form appears on the Payment Page. You will see the Field Label is highlighted in yellow and the Value is highlighted in blue:

Example of completing the form to collect required information from recipient
Below is an example:
Below is an example of how the above completed form appears on the Payment Page. You will see the Field Label is highlighted in yellow and the Value is a form field for the customer to input.

Send a Refund Request
A Refund Request is where you are returning/refunding money, and you are requesting that the Recipient provide the credit card number to which the refund should be sent. The Recipient will receive an email where they will click on the link and be brought to a Payment Page where they will input the credit card that the refund should be applied to. All Refund Requests require that the Recipient correctly enter the Secret Answer set by you.
Required Fields
The following fields must be completed for each Request:
Name of Recipient: This is the name of the person to whom you are sending the Refund Request. This does not have to match the name on the credit card.
Email Address: This is the email address for the Recipient where the Refund Request will be sent.
Refund Amount: The amount that will be refunded to the Recipient's credit card.
Expiry Date: This is the date that the Request will expire at 11:59pm EST. For example, if the expiry date is October 16th, the Request can accept a payment up until 11:59pm EST on October 16th. Refund Requests can be active between 1 and 7 days.
Secret Answer: A secret answer (i.e., a word, phrase, or password) decided by you that the Recipient will have to provide in order to claim the refund. This provides an added layer of security. The Recipient has 3 chances to correctly input the Secret Answer otherwise, the Request is put in Security status, requiring you to reactivate it.
Secret Hint: A hint or clue provided by you to assist the Recipient in providing the correct Secret Answer. It cannot contain any word from the Secret Answer.
Optional Settings
You may choose to configure the following settings:
Enable Automatic Reminders: This option enables automatic payment reminder emails to be sent out to the recipient at the chosen interval (e.g., every 2 days) until the payment is either completed or expires. Use the drop-down to customize the frequency of reminders. At any time, you can shut off or modify the automatic reminders. You can also track when the next reminder will be sent out by looking at the Request's Overview page.
(Alternatively, you can manually initiate sending a payment reminder using the Action button on the Payment Request home page.)
Do not pass processing fees onto the customer: This setting will only appear if you are on a CustomerPay pricing plan. The default is to have the processing fees passed onto the customer, however, you can override this by selecting the box, in which case, you will be responsible for paying the processing fees for that transaction.
Optional Fields
Both the Invoice Field and Description Field are optional and are designed to give you flexibility. You may use the fields as you choose.
The Invoice Field and Description Field each have two fields within them: Field Label and Value
- The Field Label refers to the Label attached to the field and is used to either (a) describe the information in the Value field, or (b) provide instruction for what should be inputted in the Value field (if you choose to use the field to collect information from the Recipient).
- The Value field refers to the information within that field and can be used to either (a) display information, or (b) collect information from the Recipient. To collect information from the Recipient, simply leave the field blank when you are completing the Payment Request form.
The Invoice Field is intended for Invoice Numbers, Program Names, and the like. If the Payment Request is associated with another transaction, by inputting the same Invoice Number in the Value, you will be "grouping" the transactions together, which is helpful for reporting purposes. The Invoice Field can have a maximum of 20 characters in the Value.
The Description Field is intended for detailed information such as a player's name, preferred position, and the like. It can have a maximum of 30 characters in the Value, making it suitable for collecting more detailed information.
Below is an example of using both fields to display information:
Collecting Information
You can use both the Invoice Field and Description Field to collect information from the Recipient. To do so, check off the box to include the field and provide a Field Label. You must leave the Value field blank and check the Required box.
Below is an example:
Previewing the Payment Page
Before sending the request, you will be able to view the payment page by selecting "Preview."
Below is an example of the Payment Page when sending a Refund Request:
Frequently Asked Questions
How do I cancel a Refund Request?
If a Refund Request is still Outstanding, meaning that it has not been claimed by the recipient, navigate to the Request and select "Cancel". The Recipient will no longer be able to access the link.
You cannot cancel a Refund Request once it has been completed. Once the Recipient has claimed the Refund and completed the Request, the transaction is final.
Transaction List
The Transaction List tool allows you to generate a filtered list of transactions based on date, card type, and transaction type. It's useful for reconciling batches, finding specific payments, or reviewing all recent activity.
The Show Refunds button at the top is a quick shortcut to filter the list by refund activity only.
Selecting a Date Range
Use this section to define the transaction period you want to view. You can either:
- Manually enter a Start and End date
- Click one of the quick filters:
- Last 7 Days
- Last 30 Days
- Last Month
- This Year
Filtering by Card Type
Select one or more card types to include in your search results. The following options are available:
- Visa
- MasterCard
- American Express
- Debit / Interac
- Other Cards - includes card types outside of the major brands
Filtering by Transaction Type
Check the boxes for the types of transactions you'd like to see in your results:
- Sales
- Returns
- Voids
- Declines
You can further refine these results using the Advanced Options dropdown.
Advanced Options
This section lets you filter by more specific transaction types. You can select one or more of the following:
- Purchase
- Sale
- Pre-Auth Completion
- Void Purchase
- Void Return
- Force Post
- Pre-Auth
- Pre-Auth Force
- Auth Only
- Settlements / Deposits
- Balance Requests
These are particularly helpful when you're looking for a specific action in the transaction lifecycle (e.g., a Pre-Authorization that was never completed).
Transaction Source
You can now filter transactions by their source to quickly narrow down activity based on how the transaction was initiated. This is particularly helpful if you're using multiple payment tools like Payment Requests or PayMe.
The following options are available from the dropdown:
- All Transactions - View every transaction regardless of how it was submitted.
- Payment/Refund Requests Only - Only displays transactions submitted via Payment Requests or Refund Requests.
- PayMe Transactions Only - Filters to show only payments collected using your PayMe links.
- Manual Transactions Only - Includes transactions processed via the Virtual/Remote Terminal.
If you don’t have these tools enabled, you may not see all of these options in your dropdown menu.
Sort Options
Choose how to sort your search results using the dropdown menu:
- Newest transactions first
- Oldest transactions first
Additional Notes
- The Show Refunds button at the top is a quick shortcut to filter the list by refund activity only.
- To narrow down transactions processed through specific payment tools like Payment Requests or PayMe, you can use the Search feature (return to the Main Menu). Simply enter the Reference Number with a % prefix to identify transactions from the following tools:
- %PR - Payment Requests
- %PM - PayMes
- %MTR - Manual Transactions
- %ER - Refund Requests
Transaction Types
| TYPE | NAME | DESCRIPTION |
| PURC | Purchase | Refers to a completed sale transaction (PREA + PRCO) |
| SALE | Sale | Refers to a completed sale transaction |
| PREA | Pre-Authorization |
Also known as a pre-auth or authorization hold, it is a temporary hold placed on a customer's credit card for the amount of the transaction until the transaction is completed. Each completed transaction will show a white "PREA" followed by a green "PRCO" to show it was successful. *The reference numbers will be the same and this is not a double charge. NOTE: If the transaction is not completed, there will NOT be an associated green "PRCO" to match the "PREA". The "hold" will automatically drop and the funds will become available if the transaction is not completed. This ensures cardholders are not charged if the registration system does not receive the transaction. |
| PRCO | Completion | Refers to finalizing a pre-authorized transaction in order to complete the transaction. |
| RETU | Return | Also known as a Refund, it is when funds are returned to the cardholder's account. |
| SETT | Settlement | Refers to closing the daily batch of transactions. This is where the actual funds themselves are moved from the cardholder's bank account to your merchant account, where they will later be deposited into your bank account. |
| FUND | Funding | Also known as Deposit, this is when all of your batches of settled transactions accumulated to date are deposited into your bank account. |
Message Column
![]() Refers to a transaction that has been settled 1 and is waiting to be deposited.
Refers to a transaction that has been settled 1 and is waiting to be deposited.
![]() Refers to a transaction that has been deposited into your bank account.
Refers to a transaction that has been deposited into your bank account.
![]() Preview the receipt for the transaction with the option to resend to the cardholder
Preview the receipt for the transaction with the option to resend to the cardholder
1 Settled refers to the transaction funds being removed from the cardholder's bank account
Frequently Asked Questions
How do I remove a Pre-Authorization (or Hold) from a customer's bank account?
A Pre-Authorization without a Completion following it will automatically disappear from the customer's bank account after a set number of days. This time frame is set by the customer's financial institution but is typically around 5-10 business days.
The PREA will still be shown in your reporting even after it is removed from the customers bank account.
What's the difference between SALE and PURC?
For all intents and purposes, there is no difference. They are both referring to the same thing - the customer is making a purchase and it will charge their credit card for the specified amount.
Whether your transaction shows up as a SALE or a PURC depends on your registration systems integration and also how the transaction was processed. For example, transactions done through the Remote Terminal will always show up as a SALE.
If you're interested in the nitty gritty, here are the fine details:
The difference lies in the back end of the payment gateway and how the transaction is processed. A PURC is the result of two transaction types being successfully completed - a Pre-Authorization and Completion (PURC = PREA + PRCO). A SALE is its own single transaction type that doesn't split up the Pre-Authorization and Completion.
Can you explain Pre-Authorizations and Pre-Completions more?
Sure!
PURC = PREA (pre-authorization) + PRCO (pre-completion)
There always needs to be a PRCO following a PREA in order for the transaction to be completed. If a PRCO does not follow a PREA, then the transaction stays as Pre-Authorization (with the funds on hold, but NOT removed from the cardholders account) until their financial institution releases it.
Here's an analogy:
Think of PREA like you calling into a store, asking if they have a shirt in your size, and then asking them to put it on hold so you can pick it up by the end of the day.
You actually aren't charged until you go into the store, pay for it and pick it up (PRCO).
If you never pick up the shirt, you won't be charged for it. But with that said, the shirt is technically still on hold under your name until the store puts it back on the shelf (PREA)
In this analogy, the financial institution that issued the cardholder's credit card (i.e. TD Visa or Scotiabank Mastercard) is the store. They are the ones who need to put the shirt back on the shelf. Right now they are still waiting for you to come in, pick up the shirt, and pay for it (PRCO).
With that said, the store has a "policy" that if merchandise is not picked up within X number of days, it will automatically go back on the shelf. Meaning, they will wait X number of days for a PRCO to follow a PREA. If they don't receive it, then the shirt will finally be put back on the shelf (the PREA will be cancelled).
If you try to process the transaction again to remove a PREA, it is equivalent to you calling the store to put another shirt on hold. It won't effect the current shirt you have on hold.
The only course of action you could take is to call the store to ask them to put it back on the shelf (meaning, ask the cardholder to call their bank to request they cancel the Pre-Authorization). Or, just wait a few days and it'll be removed automatically!
Search
The Search tool helps you find specific transactions quickly using either detailed search fields or general customer info.
Advanced Search
Use this section when you have specific transaction details. You can combine multiple fields to narrow down the results.
- Card Number: Enter the last 4 digits of the card used
- Amount: Enter the transaction amount (e.g., 100.00).
- Reference Number: Use the full reference number if you have it -- or search using one of the following prefixes to locate transactions processed through specific tools:
- %PR - for Payment Requests
- %ER - for Refund Requests
- %PM - for PayMes
- %MTR - for Manual Transactions
- Invoice: Search by the invoice number linked to the transaction.
- Auth Code: Enter the 6-digit authorization code, if known.
Tip: The more fields you use together, the more precise your search results will be.
Note: You can only filter by PayMe if you have PayMe enabled.
Search by Customer or Description
If you're not sure about the exact transaction details, you can search using customer information instead. Only one of these fields can be used at a time -- and these searches will override anything entered in the Advanced Search above.
Options include:
- Customer Name: Type any part of the customer's name.
- Email Address: Enter any part of the customer's email.
- Description: Search by any word or phrase included in the transaction description.
Things to Keep in Mind
- You can either use Advanced Search or Customer/Description Search - not both at once.
- When unsure of the exact value, partial entries work for name, email, or description fields.
- Use the % prefix in the Reference Number field to filter by transaction type across tools.
- You can only filter by PayMe if you have PayMe enabled.
Transaction Types
| TYPE | NAME | DESCRIPTION |
| PURC | Purchase | Refers to a completed sale transaction (PREA + PRCO) |
| SALE | Sale | Refers to a completed sale transaction |
| PREA | Pre-Authorization |
Also known as a pre-auth or authorization hold, it is a temporary hold placed on a customer's credit card for the amount of the transaction until the transaction is completed. Each completed transaction will show a white "PREA" followed by a green "PRCO" to show it was successful. *The reference numbers will be the same, and this is not a double charge. NOTE: If the transaction is not completed, there will NOT be an associated green "PRCO" to match the "PREA". The "hold" will automatically drop, and the funds will become available if the transaction is not completed. This ensures cardholders are not charged if the registration system does not receive the transaction. |
| PRCO | Completion | Refers to finalizing a pre-authorized transaction in order to complete the transaction. |
| RETU | Return | Also known as a Refund, it is when funds are returned to the cardholder's account. |
| SETT | Settlement | Refers to closing the daily batch of transactions. This is where the actual funds themselves are moved from the cardholder's bank account to your merchant account, where they will later be deposited into your bank account. |
| FUND | Funding | Also known as Deposit, this is when all of your batches of settled transactions accumulated to date are deposited into your bank account. |
Message Column
![]() Refers to a transaction that has been settled 1 and is waiting to be deposited.
Refers to a transaction that has been settled 1 and is waiting to be deposited.
![]() Refers to a transaction that has been deposited into your bank account.
Refers to a transaction that has been deposited into your bank account.
![]() Preview the receipt for the transaction with the option to resend to the cardholder
Preview the receipt for the transaction with the option to resend to the cardholder
1 Settled refers to the transaction funds being removed from the cardholder's bank account
Frequently Asked Questions
How do I remove a Pre-Authorization (or Hold) from a customer's bank account?
A Pre-Authorization without a Completion following it will automatically disappear from the customer's bank account after a set number of days. This time frame is set by the customer's financial institution but is typically around 5-10 business days.
The PREA will still be shown in your reporting even after it is removed from the customers bank account.
What's the difference between SALE and PURC?
For all intents and purposes, there is no difference. They are both referring to the same thing - the customer is making a purchase and it will charge their credit card for the specified amount.
Whether your transaction shows up as a SALE or a PURC depends on your registration systems integration and also how the transaction was processed. For example, transactions done through the Remote Terminal will always show up as a SALE.
If you're interested in the nitty gritty, here are the fine details:
The difference lies in the back end of the payment gateway and how the transaction is processed. A PURC is the result of two transaction types being successfully completed - a Pre-Authorization and Completion (PURC = PREA + PRCO). A SALE is its own single transaction type that doesn't split up the Pre-Authorization and Completion.
Can you explain Pre-Authorizations and Pre-Completions more?
Sure!
PURC = PREA (pre-authorization) + PRCO (pre-completion)
There always needs to be a PRCO following a PREA in order for the transaction to be completed. If a PRCO does not follow a PREA, then the transaction stays as Pre-Authorization (with the funds on hold, but NOT removed from the cardholders account) until their financial institution releases it.
Here's an analogy:
Think of PREA like you calling into a store, asking if they have a shirt in your size, and then asking them to put it on hold so you can pick it up by the end of the day.
You actually aren't charged until you go into the store, pay for it and pick it up (PRCO).
If you never pick up the shirt, you won't be charged for it. But with that said, the shirt is technically still on hold under your name until the store puts it back on the shelf (PREA)
In this analogy, the financial institution that issued the cardholder's credit card (i.e. TD Visa or Scotiabank Mastercard) is the store. They are the ones who need to put the shirt back on the shelf. Right now they are still waiting for you to come in, pick up the shirt, and pay for it (PRCO).
With that said, the store has a "policy" that if merchandise is not picked up within X number of days, it will automatically go back on the shelf. Meaning, they will wait X number of days for a PRCO to follow a PREA. If they don't receive it, then the shirt will finally be put back on the shelf (the PREA will be cancelled).
If you try to process the transaction again to remove a PREA, it is equivalent to you calling the store to put another shirt on hold. It won't effect the current shirt you have on hold.
The only course of action you could take is to call the store to ask them to put it back on the shelf (meaning, ask the cardholder to call their bank to request they cancel the Pre-Authorization). Or, just wait a few days and it'll be removed automatically!
Batches and Deposits
Batches
Every night at 12:00am EST, all transactions your organization processed that day are grouped together and finalized into "batch".
Think of a batch as a daily summary of payments. If no transactions occurred that day, there won't be a batch created.
Note: Each batch is dated based on the settlement time - not the transaction time. For example, the batch dated April 5th includes payments made on April 4th.
You can view the total amount for a batch in the Response column. To see a breakdown of each individual transaction within a batch, click Detail.
Deposits
Deposits are made to your bank account once a week - every Tuesday - and should appear in your account by Wednesday.
Each deposit includes all batches from the previous week, starting from Monday and ending on Sunday.

Refer to the Bank Activity section to see all credits (like deposits) and debits (like refunds or billing fees) applied to your account.
Transaction fees are not deducted from your deposits. This makes it easy to match the amounts in your deposit with your batch totals.
Statements
Billing is withdrawn from your bank account on the 5th of each month. Your statement will be emailed to the address on file and posted here before that. You can download a PDF copy of your statement by clicking on the PDF icon: ![]()
Billing is done as a separate transaction and not combined with any deposits.
An ongoing archive of all statements is kept on PaymentsHQ.
For any billing inquiries, please contact us via email at support@sportspay.com or via our toll-free phone number at 1-877-880-0321
Bank Activity
Billing Statement
This type of entry refers to the debiting of your bank account for your monthly billing statement.
Credit Card Sales
This is referring to either a credit applied to your bank account for your credit card sales or a debit related to credit card sales that you refunded (for example, if you process more refunds than sales).
Account Information
Updating Your Account Information
You can review and request changes to your organization's key details - like your name, address, contact info, and banking details - from the Account Information page.
- Select "Update" beside the field you want to change.
- You'll be prompted to enter the new information.
- Click "Request" to submit the change.
Once your change is submitted, a green confirmation banner will appear at the top of the page. You'll see your updated information once the change has been approved - typically within 24 hours.
Language Preference (if available)
If your organization serves French-speaking users, you may see a Default Language setting in your Account Information page. This controls the language used for all system-generated content, including:
- Receipts
- Payment pages
- PayMe links
- Payment and refund request emails
If this option is enabled for your account, you can switch between English and French at any time by clicking the "Switch" button beside the setting.
If you don't see a language option, it means your organization is set to English-only by default.
Need to Update Something Else?
If you need to update something that isn't listed - or prefer not to use the online update tool - feel free to contact our support team.
You can email your request to support@sportspay.com and we'll take care of it for you.
For security, we may need to verify the request is coming from the person authorized to make changes on behalf of your organization.
Manual Transactions
Access your Remote Terminal by clicking on:
You will also find a list of your Recent Manual Transactions. These transactions are also included in your Transaction Reports.
Manual Transactions are not integrated into your registration system. That means that any transactions or refunds done through here will not be shown in your registration system. You will need to manually update your registration system.
Use the INVOICE and DESCRIPTION fields to keep track of what each transaction is for. The INVOICE field is shown on the receipt, but the description is not.
Frequently Asked Questions
What is the fee to process a manual transaction?
There is no additional fee to process a manual transaction. Only your per transaction fee applies.
Virtual Terminal
To process a manual transaction, the following fields are required:
- Customer Name
- Customer Email address
- Credit Card Number
- Expiration Date
- Amount
You have the option of inputting the following fields:
- Invoice Number: This field will be displayed on the customer's receipt
- Description: This field is only displayed in PaymentsHQ and is useful for administrative purposes. For example, you can use it to describe what the manual transaction is for - "Johnny Smith's late fee"
Your organization will receive an email notification for each manual transaction processed. You also have the option to send an email receipt to the customer by checking the applicable box.
Frequently Asked Questions
What is the fee to process a manual transaction?
There is no additional fee to process a manual transaction. Only your per transaction fee applies.
PayMe
PayMe Forms is where you can create your own form or webpage to collect various payments, such as donations, tournament fees, travel expenses, etc. Each PayMe that is created is given its own designated URL and QR code that you can then share with your customers to easily accept multiple payments.
For convenience, Sign-Up and Fundraising form templates already exist. Alternatively, you can use the Custom form to fully modify all fields to better fit your needs.
PayMe Landing Page
All of your active PayMe forms (that you've not set as 'Private') are conveniently located on your organization's designated Landing Page. Rather than having to share each of your PayMe URLs or QR codes, you can choose to share your organization's landing page URL or QR code (or even post it on your website) and direct your customers there to see your full list of active PayMe forms.
To locate your organization's Landing Page URL or QR code, simply click on the text "PayMe Landing Page" and you can choose to open the link, open the QR code, or copy the URL as shown below.
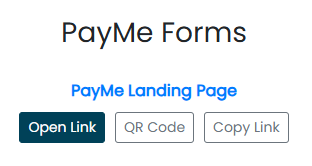
If a PayMe is set as "Private", it will not show on your public landing page
Example of PayMe Landing Page
Each PayMe is colour-coded:
- Sign-Up PayMe's are in blue
- Fundraising PayMe's are in green
- Custom PayMe's are in orange
PayMe's that are inactive (i.e. waiting, closed, or expired) will appear faded.
Once a PayMe has been archived by you, it will no longer appear on the Landing Page.

Viewing your PayMe's
Your PayMe's are organized into two reporting groups:
- Active: PayMe's that are active and have been sent, but have yet to be completed by the Recipient. These include requests with a status of Expired and Security.
- Archived: PayMe's that have been archived by you and are no longer editable. Once you are sure that you no longer need to amend a PayMe, you can archive it. (Note: When you archive a PayMe, this does not affect your ability to refund a payment.)
PayMe Overview
Click on the PayMe name for an overview of your PayMe and to view further details, such as its history and a list of all payments under that PayMe.
Status
Each PayMe can have a different status:
| A PayMe that is accepting payments | |
| PayMe has reached a maximum number of accepted payments and is now closed. If any payments are refunded, it will reopen until it has reached a maximum number of accepted payments. You can always modify the PayMe and increase or decrease the maximum number of accepted payments, should it be required. | |
| Waiting to open on the PayMe's start date and time as set by you. | |
| A PayMe that has expired or you have manually closed. To re-open, you must modify the PayMe and update the Expiry Date. | |
| PayMe has been archived and is no longer editable. |
Actions
Depending on the reporting group you are viewing and the status of the request, there are different Actions available:
![]() Modify: Modify the PayMe
Modify: Modify the PayMe
![]() Preview: View the PayMe
Preview: View the PayMe
![]() Share Link: Copy the URL for the PayMe
Share Link: Copy the URL for the PayMe
![]() QR Code: View and copy the QR code for the PayMe
QR Code: View and copy the QR code for the PayMe
![]() Manually Close: Manually close this PayMe so no further payments can be made. This action can be undone.
Manually Close: Manually close this PayMe so no further payments can be made. This action can be undone.
![]() Archive: Permanently archive the PayMe. This action cannot be undone.
Archive: Permanently archive the PayMe. This action cannot be undone.
Creating a PayMe
Use a PayMe to collect payments with the option to include a start date, expiry date and a maximum number of payments.
PayMe Details
Fields available to create your PayMe will differ depending on which template you choose (SignUp, Fundraiser or Custom).
Title of PayMe: A unique name given to the PayMe, and should be descriptive of what the PayMe is for. You cannot reuse PayMe names.
Amount: The amount of the payment. You may leave it blank to have the customer input the amount, although this is more applicable for fundraising PayMe's.
Max # of Payments: Set the maximum number of approved payments allowed under the PayMe. For unlimited payments, leave it blank. Please note that only approved and completed payments count towards the running total, and any declined payments do not count. Similarly, any payments that you refund will update the running total.
Start Date: This is the date and time that PayMe will open. If you wish to start PayMe immediately, simply leave it blank. Please note that all times are in Eastern Standard Time (EST).
Expiry Date: This is the date that the PayMe will expire, close, and no longer accept payments. If you wish to leave the PayMe open indefinitely, leave it blank. Alternatively, leave it blank and set the "Max Number of Payments" if you wish to only close it once it's full. Please note that all times are in Eastern Standard Time (EST).
Optional Fields
Both the Division/Program Field and the Player's Name Field are optional and are designed to give you flexibility. You may use the fields as you choose.
The Division/Program Field and Player's Name Field each have two fields within them: Field Label and Value
- The Field Label refers to the Label attached to the field and is used to either (a) describe the information in the Value field, or (b) provide instruction for what should be inputted in the Value field (if you choose to use the field to collect information from the Recipient).
- The Value field refers to the information within that field and can be used to either (a) display information, or (b) collect information from the Recipient. To collect information from the Recipient, simply leave the field blank when you are completing the PayMe form.
The Division/Program Field is intended for Division, Program, Class Names, and the like. By inputting the same Value in the field, you will be "grouping" the transactions together, which helps reporting purposes (i.e., you can search "Midgets 24 Fall" in reporting and it will list all payments with that value listed in the Division/Program Field. The Division/Program Field can have a maximum of 20 characters in the Value.
The Player's Name Field is intended to collect detailed information such as the player's name, preferred position, and the like. It can have a maximum of 30 characters in the Value, making it suitable for collecting more detailed information.
Below is an example of using both fields to display information:

Collecting Information
You can use both the Division/Program Field and the Player's Name Field to collect information from the Recipient. To do so, check off the box to include the field and provide a Field Label. You must leave the Value field blank and check the Required box.
Below is an example:

Previewing the Payment Page
Before creating the PayMe, you will be able to view the payment page by selecting "Preview."
Below is an example of the Payment Page for a PayMe:

Frequently Asked Questions
What happens when I refund a payment for a PayMe where there is a maximum number of payments?
If you refund a payment for a PayMe where there is a maximum number of payments, it will update the record of number of payments.
If the PayMe is closed because the maximum number of payments has been reached, and you then refund a payment, the PayMe will reopen again until the maximum number of payments is reached again.
PayMe Use Case - Sell Merchandise
PayMe Forms is where you can create your own form/webpage to collect various payments such as donations, tournament fees, travel expenses, etc. Each PayMe that is created is given its own designated URL/link that you can then share to accept multiple payments.
For convenience, there are SignUp and Fundraising pre-built forms. Alternatively, you can use the Custom form to fully modify all fields.
PayMe Landing Page
All of your active PayMe's (that you've not set as 'Private') are conveniently located on your organization's designated Landing Page. Rather than having to share each of your PayMe's URL/link, you can choose to share your organization's landing page URL/link (or even post it on your website) and direct your customers to find it there.
To locate your organization's Landing Page URL/link, simply copy the URL/link from the browser.
Unless a PayMe is set as "Private", it will show on your public landing page
Example of PayMe Landing Page
Each PayMe is colour-coded:
- SignUp PayMe's are in blue
- Fundraising PayMe's are in green
- Custom PayMe's are in orange
PayMe's that are inactive (i.e. waiting, closed or expired) will appear faded.
Once a PayMe has been archived by you, it will no longer appear on the Landing Page.
Viewing your PayMe's
Your PayMe's are organized into two reporting groups:
- Active: PayMe's that are active that have been sent, but have yet to be completed by the Recipient. These include requests with a status of Expired and Security.
- Archived: PayMe's that have been archived by you and are no longer editable. Once you are sure that you no longer need to make an amendment to a PayMe, you can archive it. (Note: You are Archiving the PayMe... this does not affect your ability to refund a payment.)
PayMe Overview
Click on the PayMe name for an overview of your PayMe and to view further details such as its history and a list of all payments under that PayMe.
Status
Each PayMe can have a different status:
| A PayMe that is accepting payments | |
| PayMe has reached a maximum number of accepted payments and is now closed. If any payments are refunded, it will reopen until it has reached a maximum number of accepted payments. You can always modify the PayMe and increase or decrease the maximum number of accepted payments, should it be required. | |
| Waiting to open on the PayMe's start date and time as set by you. | |
| A PayMe that has expired or you have manually closed. To re-open, you must modify the PayMe and update the Expiry Date. | |
| PayMe has been archived and is no longer editable. |
Actions
Depending on the reporting group you are viewing and the status of the request, there are different Actions available:
![]() Modify: Modify the PayMe
Modify: Modify the PayMe
![]() Preview: View the PayMe
Preview: View the PayMe
![]() Share Link: Copy the URL/Link for the PayMe
Share Link: Copy the URL/Link for the PayMe
![]() Manually Close: Manually close this PayMe so no further payments can be made. This action can be undone.
Manually Close: Manually close this PayMe so no further payments can be made. This action can be undone.
![]() Archive: Permanently archive the PayMe. This action cannot be undone.
Archive: Permanently archive the PayMe. This action cannot be undone.
Customer Pay

